Working with User Profiles
Click on row in the Users dashboard to view the profile of the user.
Note
Users with the Support role do not have access to a user’s profile.
Delete - Allows you to delete this user from the platform. Once a user has been deleted the process cannot be reversed.
Prev/Next - Use these buttons to the profile for the next user in your users list.
Force GreenPass/Remove GreenPass - Add or remove a GreenPass for a user. Forcing a GreenPass does not require the user to present any documentation. This will only grant the GreenPass for one day.
Force BluePass/RemoveBlue - Add or remove a BluePass for a user. To force a BluePass enter a Reason, Valid Until date and upload documentation, then click Set.
Save - Saves changes made to the user profile.

User ID and Full Name - The User ID and Fill Name fields are created when the user is added and cannot be edited.
First Name and Last Name - This is the first name and last name of the user.
Preferred Name - This is the preferred name of the user and will display in all messages to the user, as well as on their home screen. This information can also be entered by the user when they complete their Personal Information or by editing their Profile Settings.
Alias ID - This field can be used for nicknames, etc.
Mobile Number - You can send a custom text message to the user by entering their phone number, then clicking the Send SMS button.
Groups - Add the user to one or more Groups by checking the corresponding box.
Health Status - Click the Health Status field to go directly to the Health Status widget.
Check Status - Indicates if the user has checked in for that day.

Zone - A Zone is specific to an organization and has its own unique Settings. Once a user has been assigned to a zone they inherit all of the characteristics of the Settings of that zone.
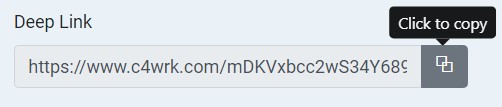
Deep Link -The Deep Link is a unique and secure link to each user. The link may be bookmarked by the user for repeated use in their browser.
The Deep Link is sent via SMS or email to the user in Reminder messages for their convenience.
You can use the Deep Link to impersonate the user and view their settings.
- Click the Deep Link copy button.
- Open up an incognito browser window.
- Paste the link in the URL field.
- Click the Enter key on your keyboard.
Note
Using an incognito browser assures that the user’s Deep Link isn’t saved to your browser history.
Tags - Tags can be added to a profile by typing the tag name in the field, then selecting an entry from the drop-down list.
Notification Preferences - Change or stop the SMS and/or Email notification preferences of a user by selecting or deselecting the checkbox next to the type of notification.
When a notification is turned off, a red dash will be added to each daily status to let the admin know this user is not receiving reminders or notifications.
Note
If the Reminder Time and Notify via are red, the user has customized their communication preferences. Subsequent user uploads will not overwrite these preferences.
An admin may only change the Reminder Time and Notify via settings for the user by using the Deep Link to impersonate the user, then changing the fields in the user’s Settings.
Check-in Card - Allows you to create a physical card with a QR code for users who are unable to show a code on their mobile device. This card allows the user to scan the code to a device and check in.
Click the Download button to create a PDF of a QR code.

Vax Card - Click the Download button to download a copy of the user's vaccination records.

Notes
The Notes widget is used to record historical notes about the user. Click on a row to expand it and view details of the note.

Temperature and test results may only be uploaded as .jpeg, .heic or .png images. PDFs are not currently supported.
Body Temperature
The Body Temperature widget is used to record the temperature of a user.
Temperature can be uploaded in three ways:
- Users can upload a photo from the Upload Temperature button from the web app. This button must be enabled via Settings -> User Experience.
- When a user gets scanned at one of our Kiosks
- An admin may add the temperature manually via the Add button
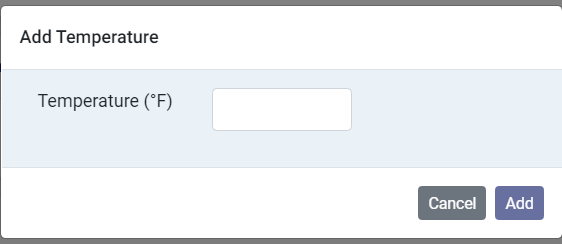
Click on a row to expand it and show the uploaded thermometer image. The temperature may also be manually entered or updated once a row has been expanded.
Tip
If a client wants to hide the exact temperature and just show pass/fail, then they can select the toggle to “Mask User Temperature” option in Settings -> Thresholds.
Insurance Information
Click the Add button to add health or travel information to the user record. Enter the information, then click the Save button.

Covid Test Information
The Covid Test Information widget is used to schedule or view tests, test results and test kit IDs.
Admins can schedule tests and add test and kit information by clicking the corresponding button at the top of the widget.

Click on a row to expand it and view information for that entry.
When a test has been scheduled for the user, a red circle displays on the right-hand corner of the Scheduled Tests button.

Vaccination Information
The Vaccination Information widget is used to manually enter Covid vaccination information. Users can enter information from multiple vaccination vendors.

Click the Add Vaccination button at the top of the widget to enter vaccination information.
Note
You cannot enter a vaccination that occured before 2019.
Boosters do not affect the validity or expiration date of a BluePass.
Click on a row to expand it and view information for that entry.
Use the Edit button to remove an image uploaded to the user’s record. Removing the image does not remove any other data for the record.
Use the Hide button to hide the last two records in the Vaccination Information list.
Once approved, an appropriate pass is granted to the user.
Medical information may be added by the user from their mobile app if the appropriate button is activated in Settings -> User Experience.
Note
Once an entry has been added it may not be edited or altered for HIPAA compliance reasons. A new entry must be added to correct any errors.
Activities
The Activities widget records all the interactions the user has with the platform.
Click on an individual row to expand the row and display detailed information about the activity.

Health Status History
The Health Status History widget is used to record all health statuses of the user. Click an individual row to expand it for details of the entry.
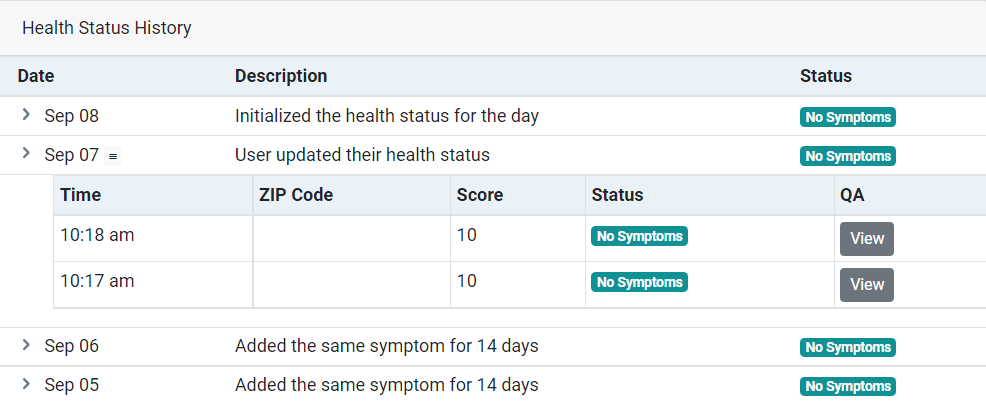
Once a row has been expanded, click the View button to see the answers to the survey questions.